I installed my new rudder return springs today. It was not that hard but is just a bit tedious. And of course I'd already spend hours looking at this and finding the extended handle duckbill pliers I already showed a picture of.
Here is what I did. Remove the seats and get them out of the way. Remove the rudder pedal base floor covers from both sides. Pull up the carpet on both sides of the tunnel sufficiently to uncover the lighting holes in each side. Using a small light in the opposite side your working on will make things easier.
If this is the first time your looking in the tunnel acquaint yourself with the parts and how the springs attach. I did not remove my rudder cables from the rudder which might make this easier but I found just moving the rudder to each stop as needed for the side your working on cave sufficient play in the system. You will probably also need to remove the inspection cover just aft of the fire wall in the center of the belly. You won't actually work through there but it makes it easier to retrieve dropped parts which you will drip.
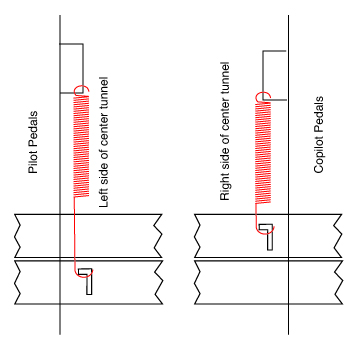
Here is a drawing of how I installed my springs. You will not that the left and right springs are not attached to the attach points in the same direction from the right and left.
- return spring.jpg (605.34 KiB) Viewed 14587 times
At this point working on the pilots side on the right rudder pedal which is actually the spring on the left side of the tunnel, using the long duckbills I reached the spring up and hooked it to the front. Next I took about a 2 foot length of 41 thousand safety wire looped over once and threaded that loop into the tunnel behind wear the spring attaches to the rear point. I hooked the free end of the spring with this loop and pulled the spring back and into position using a regular needle nose pliers to snap the hook into the hole. Then release the loop of safety wire and pull it out form around the spring hook and your done one side. Took me about 10 minutes once I was set.
Now the copilot side and the left pedal with the spring that is on the right of the tunnel. This spring will be the one with the shortest hook. Do the same on this side to hook the front as you din on the left side. But on this side you need to feed you loop of safety wire from behind the rear attach point and to the left of the lever it attaches to and then up front to hook the spring. Pulling back on the spring hook to get it in position and this time just using your fingers through the side holes to manipulate the hook into it's hole. Release the loop of safety wire and pull it out and the hard part is over. Another 15 minutes for me and no cuss words to this point.
Flip the carpet back into place and reinstall the pedal floor plates. It is OK to cuss when you drop a few screws into the belly trying to reinstall these panels. Then remember to reinstall the inspection cover on the belly and reconnect the rudder cables if you disconnected them and your done.
While I probably won't remove my new springs to demonstrate how to install them I would be more than happy to open up my plane and give a quick demo at this years convention if George runs short of material.


