Wiring upgrade **look what I found!!**

How to keep the Cessna 170 flying and airworthy.

Moderators: GAHorn, Karl Towle, Bruce Fenstermacher

User avatar
huminajumina
Posts: 19
Joined: Sun Jun 14, 2020 4:29 pm

Wiring upgrade **look what I found!!**

Post by huminajumina »

Hey everyone, I am in the middle of upgrading to a PlanePower Alternator, and removing the older fuses for Circuit Breakers. I found several things along the way. I tried my best to mic my wiring and do the calculation, it appears to be 10AWG while 8AWG is the minimum, so I pulled a few things to upgrade the new wiring to and from the Buss bar.

First thing I found was this, now I know you can wrap wire around a steel core to make an electro-magnet, but this?? 8O
Image
Image

It turns out its the single shielded wire for my fuselage strobe, (Which has been upgraded to the wheelen LED version by the PO). I guess it just got wrapped around insulation while pulling wires and no one noticed.

The next Thing I found was my stall horn is run directly to the buss bar without the required 2A fuse/CB that the POH shows. So I am glad I can rectify that with my CB upgrade.

Heres my "Original" setup, removing it all to replace with a new Circuit breaker Panel. definitely had hot spots on several fuses where the solder connects the wiring. I found several people on here talking about Gen fuses blowing and solder overheating, so I am glad I could use the forums to help push my decision to upgrade my electrical system.
Image
Heres the Alternator, pretty nice setup, and its a straight forward process to swap it out.
Image

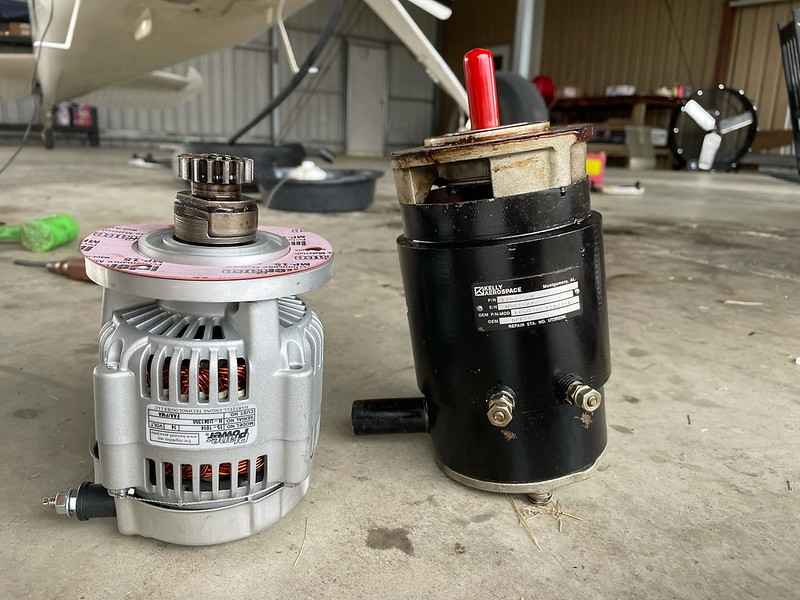
The kit did, however, come with the wrong gasket, and I again turned to the 170 Association to get the correct PN for a gasket, and members suggested I replace my Tach Drive Seal at the same time, so I did that as well, Thanks!!!
Image

The Kit comes with some weight reduction, but doesn't mention the reduction of weight from Zip Ties alone :roll:
Image

Here is my new buss bar setup, I calculated 1/8" x 1/2" copper, and used that for both the main and avionics buss.
Image
Image

While removing the battery to start the project I noticed my somewhat new Gill battery is swollen and expanded on all sides..... I am going to replace it with a lightweight SBSJ-16 Battery, but how does everyone feel about this Gill battery being swollen? my guess is the previous owner left it on a trickle charger for nearly 2 years.
Image
1954 170B Hedgesville, WV
Rudi
User avatar
GAHorn
Posts: 21016
Joined: Fri Apr 12, 2002 8:45 pm

Re: Wiring upgrade **look what I found!!**

Post by GAHorn »

Is that your NEW or your OLD tach-drive seal? (Some of the older ones had both sides encapsulated with metal and the pic makes me think it must be your old seal (thx to Steve Grimsley for teaching me that at Kelowna convention)...or you’ve installed a NOS one. New seals are open on the side which faces the engine. Remember, you’re trying to keep oil INside the engine so the seal must be properly oriented.)

I doubt that pulling a wire would wrap itself so neatly/tightly/numerously around a piece of insulation. I’m betting the older fuselage strobe issued “noise” in the audio circuit so someone used the insulation as a “core” to wind coils upon to get rid of the noise.

Scary what is found in old wiring of these airplanes...and much of it is older, cloth-covered stuff. You’re gonna really feel a lot better after you finish this job. Congrats of finding that stuff!
'53 B-model N146YS SN:25713
50th Anniversary of Flight Model. Winner-Best Original 170B, 100th Anniversary of Flight Convention.
An originality nut (mostly) for the right reasons. ;)
User avatar
huminajumina
Posts: 19
Joined: Sun Jun 14, 2020 4:29 pm

Re: Wiring upgrade **look what I found!!**

Post by huminajumina »

Hey thanks,

Yea that is a picture of the old seal coming out. It was a single side of metal, so installed the wrong way. Good point, I'm sure that original high draw strobe had a lot more interference. Yes I definitely feel like every time I pull something apart it ends up better!! Last time I did wiring, i found an old green garden hose used as wire loom :roll:
1954 170B Hedgesville, WV
Rudi
User avatar
dstates
Posts: 476
Joined: Sun Jun 30, 2019 5:50 pm

Re: Wiring upgrade **look what I found!!**

Post by dstates »

I've been there... I replaced 95% of my wiring last winter and went from fuses to circuit breakers. I found some really sketchy stuff too. I'm so glad I did that job and you will be too. I made a new schematic specific to my plane while I was doing it. My A&P/IA was glad to see that. I recommend doing that while you are intimate with the circuits now.

Also, don't forget to leave room to label your breakers.

I don't know anything about batteries, but that looks pretty bad.

Doug
N1235D - 1951 170A - SN: 20118
User avatar
GAHorn
Posts: 21016
Joined: Fri Apr 12, 2002 8:45 pm

Re: Wiring upgrade **look what I found!!**

Post by GAHorn »

That battery might have frozen if it were discharged in really cold wx. I’m glad you’re replacing it.
'53 B-model N146YS SN:25713
50th Anniversary of Flight Model. Winner-Best Original 170B, 100th Anniversary of Flight Convention.
An originality nut (mostly) for the right reasons. ;)
User avatar
cessna170bdriver
Posts: 4063
Joined: Mon Apr 22, 2002 5:13 pm

Re: Wiring upgrade **look what I found!!**

Post by cessna170bdriver »

I’m curious as to how you will use what looks to me like three electrical busses. I have two, a main bus and an avionics bus. I have a 20A breaker on the main bus which feeds the original avionics master switch, which in turn feeds the avionics bus. Also, what is the breaker all by itself?
Miles

“I envy no man that knows more than myself, but pity them that know less.”
— Thomas Browne
User avatar
huminajumina
Posts: 19
Joined: Sun Jun 14, 2020 4:29 pm

Re: Wiring upgrade **look what I found!!**

Post by huminajumina »

Doug,
Yes thanks, I do plan to label the breakers with a label maker, clear background with white lettering for now (maybe something nicer later on). and yes you are right, I do plan to make better schematics, I have the original, the Alternator conversion schematic, then the additions I've made (To include the Quasar lights and , NSP position lights.... ok, its a lot! I've got some work cut out ahead of me!!!! :roll: :lol:

George,
I bet youre right!! The previous owner had the plane stored in his hangar for about 9+ years, at some point the battery came along and sat on a battery maintainer.... I don't need anything that comes from battery issues. I've got the new one in already and its a done deal!


Miles,
So the single breaker was added after I cut bus bars (it is for the Cigarette lighter, to update the Automotive style fuse holder) I plan to make a longer continuous bus to incorperate it..... that is on the Avionics bus... The other bus bar (short guy) is just part of the Main, I didn't want to heat and bend copper (Affecting its conductive properties) so I just plan to make a 8AWG jumper from the two style of breakers.... as for the bus feeder breaker to the avionics, it will be a switch/CB that will feed the avionics.

Difficult to explain but I hope that makes since... I didn't want to add an additional breaker just for a bus feed, so I've incorporated it into the switch.
1954 170B Hedgesville, WV
Rudi
User avatar
GAHorn
Posts: 21016
Joined: Fri Apr 12, 2002 8:45 pm

Re: Wiring upgrade **look what I found!!**

Post by GAHorn »

Circuit Breaker discussion reminds me of one of the common reasons given for replacing fuses with breakers: “ It’s easier to reset a breaker than replace a fuse in the dark.”

While that is true.... The question we should ask ourselves is “Should We? (Be resetting breakers in-flight.) 8O

At one time pilots were taught it was “OK” to reset a breaker one time. But more recently it is recommended that FIrst Consider if you MUST have that item in order to complete the flight before resetting a C.B. If you can complete the flight or get safely on the ground without that item DO NOT RESET that breaker!

Although not blamed in the Air Canada 797 fire, the crew RESET the lavatory circuit breakers at least THREE times and perhaps more while in-flight. Subsequently the flight attendants reported a lavatory fire to the crew. The cause of the lavatory fire was never determined but it killed 23 people and destroyed the aircraft.
458073A2-59E5-44C4-8744-49855D5E803F.jpeg
458073A2-59E5-44C4-8744-49855D5E803F.jpeg (31.3 KiB) Viewed 12685 times
'53 B-model N146YS SN:25713
50th Anniversary of Flight Model. Winner-Best Original 170B, 100th Anniversary of Flight Convention.
An originality nut (mostly) for the right reasons. ;)
User avatar
huminajumina
Posts: 19
Joined: Sun Jun 14, 2020 4:29 pm

Re: Wiring upgrade **look what I found!!**

Post by huminajumina »

Don't worry!!! I am not replacing fuses to get unlimited resets!!!! 8O

Like you stated, If a system fails in flight, and the flight can be continued without it, that is the best course of action.

but i am more updating them to get rid of the problems causing the fuse/fuses to blow....or ones that are aged and have connection issues
1954 170B Hedgesville, WV
Rudi
User avatar
c170b53
Posts: 2528
Joined: Mon Apr 22, 2002 8:01 pm

Re: Wiring upgrade **look what I found!!**

Post by c170b53 »

The pilots R/ H rudder pedal needs attention, really soon.
Jim McIntosh..
1953 C170B S/N 25656
02 K1200RS
User avatar
Richgj3
Posts: 191
Joined: Wed May 27, 2020 3:13 pm

Re: Wiring upgrade **look what I found!!**

Post by Richgj3 »

I love/hate pictures like that. Brings back memories. It’s amazing how devastating it can look in the middle of the job and then turn out great. Some before/during/after photos of mine. I didn’t do it. Just watched from afar while it was done.

Sequence is reverse. Done is first, during is second and before is third.
Attachments
E484F6BB-9A12-49FD-98A9-073DA0A03D10.jpeg
009235DC-7F87-4E9F-83CB-673766BE2D16.jpeg
659BEDF5-8830-478A-831F-53522294C55C.png
Rich Giannotti CFI-A. CFI-I SE.
1952 C170B
N2444D s/n 20596
User avatar
mmcmillan2
Posts: 161
Joined: Sat Jul 04, 2020 9:30 pm

Re: Wiring upgrade **look what I found!!**

Post by mmcmillan2 »

Looking nice!
170B owner, KCFD, CFI(I), ATP Multi
User avatar
huminajumina
Posts: 19
Joined: Sun Jun 14, 2020 4:29 pm

Re: Wiring upgrade **look what I found!!**

Post by huminajumina »

Jim, All the rudder pedals are off now. I have been keeping an eye on that one, I have the newer style to put on, and I can fully investigate where the problem is.

Rich, wow, that after picture looks really good!!! Yes you're right, some times its tough to walk back in the hangar and see it all apart, but worth it at the end! Thanks thats some good motivation!!
mmcmillan2 wrote:Looking nice!


Thank you, I cannot wait to see what it looks like all done. This has turned into a bigger project than I set out to do!!! 8O :lol: :lol:
1954 170B Hedgesville, WV
Rudi
User avatar
huminajumina
Posts: 19
Joined: Sun Jun 14, 2020 4:29 pm

Re: Wiring upgrade **look what I found!!**

Post by huminajumina »

So I got the F Atlee Dodge SBSJ-16 Battery box, and a Hawker Battery from Spruce.... Since mine was swollen, My Master contactor solenoid was working but looked old (old Style), so I figured no is the time to avoid drilling the 2 extra holes and get the newer style.
Image
Image


Then as Jim stated, my rudder pedals needed some attention and I happened to find a set of newer style pedals here on the forums, from another member. I will inspect everything else and see where the problem is, but I kinda wanted to swap out the pedals for the newer style any way, and I thought removing the pilots side would help me get to the nutplates for the new battery box (It didn't)!

Image


All of this and my spinner is still backordered until Jan 4th from Spruce (manufactured by Wag-Aero) I was going to remove the backing plate and put on a skull cap for a month or so, but they seem to be backordered as well... If anyone has any spinner ideas, let me know... I can't cancel my "Special Order" With Spruce, even though it is Backordered for two months now.... :oops:
1954 170B Hedgesville, WV
Rudi
User avatar
c170b53
Posts: 2528
Joined: Mon Apr 22, 2002 8:01 pm

Re: Wiring upgrade **look what I found!!**

Post by c170b53 »

This has turned into a bigger project than I set out to do!!! 8O :lol: :lol:
Almost every project does! Very good effort here.
You could swap your pedals from the co-pilots side and keep the original look whilst you hunt for a pedal. At the same time you can clean all the rudder tube blocks and check your master cylinder attachment points for structural deficiencies. (more project creep but you are waiting :D )
Jim McIntosh..
1953 C170B S/N 25656
02 K1200RS
Post Reply