Page 2 of 4
Re: Instrument Panel Upgrade
Posted: Tue Dec 29, 2009 12:11 am
by LBPilot82
Well, I personally didn't make the panels, no. But the previous owner did. He was quite an artist when it came to sheetmetal work. Should be pretty straight forward, just have to find some material that will handle the shaping and form it over a peice of shaped wood.
Re: Instrument Panel Upgrade
Posted: Thu Dec 31, 2009 8:10 pm
by n2582d
Joe,
On the pictures you posted of the panel I don't see the stall warning light/buzzer. It's required equipment. Later models hid the buzzer behind the panel and only had the light on the panel. With all the modification on the panel I would check to see how hacked up the stationary panel is behind the instrument panel. According to Harry Dellicker that bulkhead is a structural member.
Re: Instrument Panel Upgrade
Posted: Thu Dec 31, 2009 8:20 pm
by busav8or
Thanks, Gary. I'll take another look at the pictures. I've only seen the panel once, which was about two weeks ago, so I don't remember where the stall warning light is now.
Re: Instrument Panel Upgrade
Posted: Thu Dec 31, 2009 8:26 pm
by GAHorn
Good catch, Gary!
The stall warning system is required equipment for all B-models. Earlier airplanes, it was optional.
This is an expensive matter if you do not have the parts to make a system operational. ($2600 new from Spruce.)
http://www.aircraftspruce.com/catalog/i ... estall.php
Re: Instrument Panel Upgrade
Posted: Sun Jan 03, 2010 3:01 am
by Watkinsnv
Joe, Yes I made the instrument panel and I also have an extra Instrument back panel with the same hole pattern and a good stock one I also have a good stock lower plastic cable and switch plate panel. Lance
Re: Instrument Panel Upgrade
Posted: Sun Jan 03, 2010 7:18 pm
by n2582d
Kyle wrote:Good Morning Joe,
You can do some nice upgrades and keep the price down. I have been working on an updated panel for my 52B model and am just about ready to start the install with the annual next month. I don't have the ability to post pictures on the forum but if you send me a PM, I can get an e-mail address for you and send the pics - or I can e-mail them to one of the readers and they can post.
Here's what I did...
My original panel is the stock unit from the 52 airframe - 7 holes straight across all 3 - 1/8" holes.
Instruments left to right are - airspeed, art. horizon, altimeter, DG (the old sperry 400 lb. type), VSI, turn coordinator and then the tach.
I purchased (from one of our members in NJ) an 8 hole panel and overlay, with the middle two instruments stacked on top of each other, and the two outer most instruments 2 -1/4" holes. I used this as a pattern to make the new sub-panel from .090 aluminum plate and matched the overlay he had to the new holes. The panel was painted with an etching primer and a very durable semi-gloss black finish coating. The panel overlay will be flat black on the inside and gloss black on the exterior face.
The updated instruments are as follows, again left to right
Airspeed, art. horizon, Century NSD-360A HSI - it's a non-slaved, vacume driven (simpler less exspensive install in my plane with current radio's), then in the two center positions on top is the altimeter and bottom is the turn coordinator (very short in depth allowing good clearance for our T style yoke bars), next is the VSI, then a clock (Waltham Watch Co. unit from my uncles F6F Hellcat - story in another thread on these forums) and finally the tach.
The best part of the overlay is that all the openings will have trim rings, yes that means I have to make the one for the HSI by hand, but no worries its a few hours on the break and it will be fine (each one I make is better than the last - eventually it will be perfect

) Not sure if I will paint the trim rings gloss black like we currently have or a dark blue metalic that would match the rest of the cabin interior metal parts (door posts etc.).
For lighting I used the Nulites, and had to shave material off the two center units as they are very close, as well as the one for my VSI and clock. We screwed them all onto a piece of wood facing out as if you were looking from behind the panel into the cockpit and pre -wired them all together for a single 2 wire tail that drops down the co-pilots side. Then I used a green highlighter to change the color from clear to a soft green and it worked slick. These will prevent the glare on the windshield I now get with the stock lighting system even with the little green booties on the bulbs...
You can imagine flying IFR with this current panel...
NAV CDI is on the radio (KX-125), then up to the panel and the DG display is not vertical but horizontal so when you turn left for example - your viewing the compass headings turning to the right , then switch display on the radio to get VOR radial, back to up to the panel... It's just all over the place

So the new panel will really be neat.
Like I said - its pretty cool and I can show you the pictures. If you really want to look at a nice setup, search out Richard Pulleys panel on the forum - it's REALLLLLLY nice.
This is just one solution that I felt like doing no better or worse than others, but for me it was within my capabilities and budget. Oh yes... I found out that a buddy had the cut-outs for the holes AFTER the panel was drilled with lots of dremel hours and filing to the wee hours were spent finishing it off.
Good Luck,
Kyle T.
Here are pictures of Kyle's panel project.
Kyle Takakjian Panel 1.jpg
Kyle Takakjian 2.jpg
Kyle Takakjian 3.jpg
Kyle Takakjian 4.jpg
Kyle, could you give some details on how you are making the trim rings? Was there a problem with the depth of the Nulites? i.e. did you have to modify the overlay for the Nulites to fit beneath it?
Re: Instrument Panel Upgrade
Posted: Sun Feb 14, 2010 4:52 am
by sgrimsley2717
With modern radios you can have a very functional earlier style piano key 170 instrument panel. Over the years I have found original pieces which have given an authentic touch to my panel. I have to upgrade to a GPS now that loran is on its way out. Attached is a recent photo. There was a ready market for the leftover panel parts that were original to the model. steve grimsley
Re: Instrument Panel Upgrade
Posted: Sun Feb 14, 2010 9:45 pm
by blueldr
Steve G.
That is the best looking "Original" type custom panel I've ever seen. Very, very nice.
Re: Instrument Panel Upgrade
Posted: Mon Mar 01, 2010 7:31 pm
by Kyle
Gary,
Sorry to take so long to respond. 87A starts its annual tomorrow. Now on to your questions...
The nulites are 3/16" thick so for the altimeter and clock I have to change the knobs to longer ones. The HSI has longer shafts and won't require longer knobs.
I've changed out the altimeter one, and am searching for a solution on the clock. Some of the instrument shops I've checked with were unable (not sure why) so I have resorted to a local clock shop and am awaiting a call back. The artificial horizon knob may also need swaping out - not sure, need to do the test fit first as the one I will use is still in the plane. From Spruce the Nulite p/n is 11-02572 and 11-02573 (w/cutout) and 42.50 per. The REALLY cool thing about Nulites is that with a simple highlighter, you can color the ring and have any color you want. Mine are green - do it twice, once and then a second coat a day or so later. In addition, if when you are trimming/cutting out the light to fit your particular instrument, if you mess it up they replace it - FREE - no questions asked.
Since everything will be out of the panel I have also installed nut rings on the back of all the replacement instruments, and will fit them on to all instruments that are re-used as well. They are kind of neat as you don't have to hold a wrench or socket behind the panel, simply screw in until slight washer compression and your all set. Made by Fastener Spacialty Inc. Spruce p/n 11-01830, price is about 9 bucks per.
Trim ring for the HSI... I have a block of wood 2" wide. 1/2" high and 12" long. in the center of the 2" wide section I cut a slot about 1/4" deep on a slight angle to hold my aluminum pieces in the vertical under a break - then as I pull the break down the metal folds in about the same dimension as the original round rings we all have now. Material is soft aluminum about .024 thick. I'm just trying to get the corners right.
I hope this helps. I'll get some more pictures as we move along.
Regards, to all.
Kyle
Re: Instrument Panel Upgrade
Posted: Tue Apr 27, 2010 11:14 pm
by j3pup
Kyle any leads on where to find a longer altimeter knob?
Re: Instrument Panel Upgrade
Posted: Wed Apr 28, 2010 4:38 pm
by GAHorn
j3pup wrote:Kyle any leads on where to find a longer altimeter knob?
Almost any instrument shop should have them.
blueldr wrote:Steve G.
That is the best looking "Original" type custom panel I've ever seen. Very, very nice.
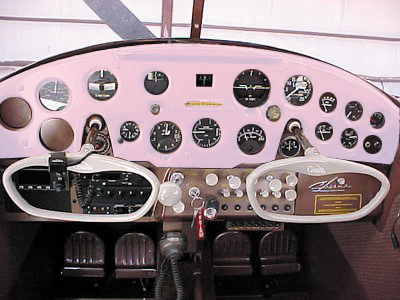
WHATSA MATTER WITH
THIS ONE?

Re: Instrument Panel Upgrade
Posted: Thu Apr 29, 2010 4:52 am
by cmsusllc
Sorry. PINK ain't orriginal!!!!!
Scott ..... 53B
Re: Instrument Panel Upgrade
Posted: Thu Apr 29, 2010 4:31 pm
by blueldr
How in hell many lovely tits were sacrificed to make that pink panel?
Re: Instrument Panel Upgrade
Posted: Sat May 08, 2010 2:54 am
by Karl Towle
Here's a panel in our 1954 B model which offers a bit more real estate to play wtih. If there is any interest, I'll work on a more detailed article describing the project. For now, let me mention an outfit called Texas Aero Plastics
http://www.buyplaneparts.com/, located at Northwest Regional (52F) in N. Texas. Following their advice, I made a mold for the plastic overlay, took it to their facility, and they vacuum formed the overlay for me while I waited, using certified materials, and at a very reasonable cost. A friend who owns a C170A did the exact same thing several years ago, of course using three molds. This is a fantastic method for achieving a factory appearance, and they are great folks to work with.
Re: Instrument Panel Upgrade
Posted: Sat May 08, 2010 1:46 pm
by Bruce Fenstermacher
ZetByte could you share a bit more detail on the process you took. Sounds very interesting. I'm dealing with instrument cover issues of my own and the thought had occurred to me just the other day how nice it might be to be able to make a new one. Of course the first image in my mined was that of a huge press stamping out a fresh aluminum panel. Of course that would be cost prohibitive. But them my mind wondered to vacuforming a plastic piece like I did as a 60's youth with my Mattel VacuForm.
A plastic piece would be for everyone like a Steve Jacobs or an "originality nuts" type of restoration but many of us would be happy with the result.
