Page 1 of 2
Sub Panel Assembly Question
Posted: Tue Nov 13, 2007 8:08 pm
by Kyle
Hello Everyone,
My airplane - 52B s/n 20939 is equiped with an 7 hole instrument panel as dipicted in my Model 170B series Parts Catolog Copy # P108-12, dated 9/1/56.
My part is found on pp73 / Fig 41 / Index No 1 / Sub-assembley, shock panel, p/n 0513025
The cover is on pp72 / Fig 40 / Index No 6 / Cover Assembly, shock panel, p/n 0412518
Now on Vic's plane, which I think is an A model, he has 8 instruments with the two in the center stacked one on top of the other. I can't find that part anywhere in my book. Is that only on an A model?
Can someone direct me to a part # as I would like to find an 8 hole sub panel and cover to purchase?
Thanks in advance,
Kyle
Posted: Tue Nov 13, 2007 8:57 pm
by doug8082a
Hey Kyle,
That configuration was part of the ragwing and A model panels (s/n 18729 - 19365). The original layout was having the compass mounted at the center-top and the VSI mounted at the center-bottom. This was also the configuration on the 140As.
Over the years people would re-locate the compass and enlarge the hole to accommodate a 3 1/8 instrument. The shock panel actually had a portion that hung down from the bottom to accomodate the VSI. This portion was removed from the A model panels begining w/ s/n 19365 and B model panels in the '52s resulting in a shock panel that is straight across the bottom.
The part numbers are:
Shock panel: 0412484
Cover: 0412489-6


Posted: Wed Nov 14, 2007 2:56 am
by Kyle
Doug,
Many thanks - that explains it. My center instrument is the 500lb DG thats bigger and heavier than anything in the panel. I'm going to look for the 8 hole unit so I can install a NAV head. I don't mind having to do a little bit of machine work so it will accomidate the larger instruments. Hopefully it will clear the T-handle behind.
One of these days I will come over to Mansfield for coffee with my laptop and get you to show me where to retrieve the parts catalog pictures electronically and post them as you and others are able to...
BTW...have you met the guy with the Stearman who is setting up an avionics shop in Mansfield MA. My son and I met him at the Marshfield fly-in. I wish him well
Hope all is well....

Kyle
Posted: Wed Nov 14, 2007 3:23 am
by doug8082a
The simplest thing to do would be to make your own shock panel and then cut a hole in the cover to accomodate the hole. If you'd rather leave your existing one intact then you'll have to scrounge the salvage yards and ebay. These things are very hard to find in an "unmodified" state. Over the years they get cut up to make room for other instruments.
Clearing the t-handle won't be a problem unless you are installing radios... which it doesn't sound like you are.
Yes, I've met the fellow at Mansfield... that would be Dave Featherston. He runs Mansfield Landing (
http://www.mansfieldlanding.com/# ). He built all those new hangars and tie downs over in quadrant 4 of the airport and is now running his avionincs shop. Real nice guy.
Posted: Wed Nov 14, 2007 3:58 am
by Kyle
Yup - he offered to take my son up in the Stearman but we just ran out of time. His reply was - no problem, just bring him by on a weekend day and I'm happy to take him up... You just have to love aviation people

, they are the best...
And your correct on my panel stuff, no fancy center stack or radio changes, just good instrumentation placed where its useful.
Posted: Mon Nov 19, 2007 4:16 pm
by doug8082a
Kyle,
I was rummaging through my old notes and remembered when I had given thought to installing a nav and/or going IFR while maintaining an original panel. Here are a few options in no particular order...
1.
a. Obtain/manufacture an “eight hole†shock panel to mount a nav head.
b. Install a nav/com or GPS/com to drive the nav
2.
a. Obtain/manufacture an “eight hole†shock panel to mount a nav head.
b. Retain your existing radios
c. Install a Narco NAV 122 in the new location (which is an integrated nav head w/built in nav receiver/tuner)
3.
a. Retain the original “seven hole†shock panel
b. Replace the DG with an HSI
c. Install a nav/com or GPS/com to drive the HSI
4.
a. Retain the original “seven hole†shock panel
b. Remove the VSI and replace it with a 2†VSI mounted in the stall warning horn location (relocate stall warning horn)
c. Install nav head in open location and
d. Install a nav/com or GPS/com to drive the nav
5.
a. Retain the original “seven hole†shock panel
b. Remove the VSI and replace it with a 2†VSI mounted in the stall warning horn location (relocate stall warning horn)
c.
i. Install nav head in the open location and nav/com to drive it or
ii. Install a Narco NAV 122 in the open location
d.
i. Replace the DG with an HSI
ii. Install a nav/com or GPS/com to drive the HSI
As you know I never actually did any of these, but I thought I'd toss them out as a few options. The Narco NAV 122 is neat because it eliminates the need to install another radio in already limited space. Of course, this all assumes you want to retain the original panel layout. If you are open to changing the panel around, then obviously most anything is possible... approval may be another story however.

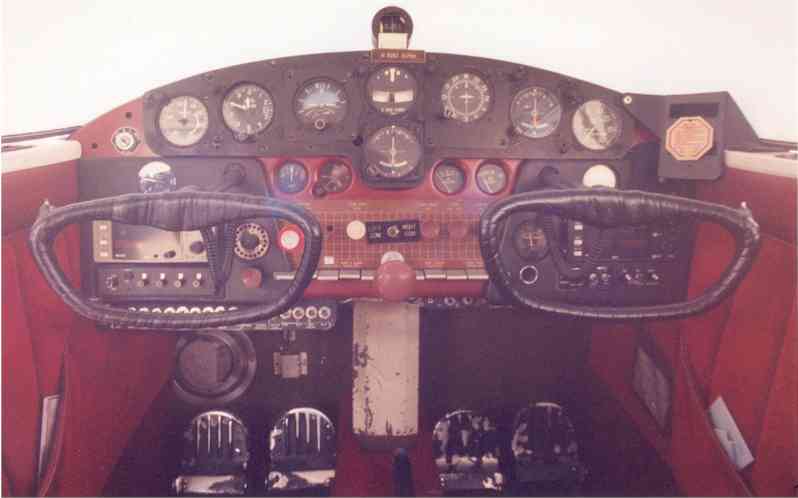
Here's a pic of my panel prior to the refurb. It's a lousy pic, but if you look closely you'll see the 2" VSI in the stall horn location. The previous owner was going to set it up as IFR so there were dual nav/coms installed as well.
Posted: Mon Nov 19, 2007 6:14 pm
by GAHorn
What is that on the far-right? A vibration inducer?

Posted: Mon Nov 19, 2007 7:39 pm
by doug8082a
Yup... but only when being used in its intended role as a mounting point for a Garmin GPS 92 as installed by the previous owner.
Posted: Wed Nov 21, 2007 3:20 am
by hilltop170
Kyle-
Another IFR certified variation, before and after upgrade. I built the new upper panel and installed the old radios and instruments in 1978. I got my instrument rating and have over 150 hours actual IFR with this panel. It was very easy to fly even though it does not have the traditional 6-pack arrangement.
The turn coordinator or whatever you put in the lower center hole in the upper panel must be short enough so that the control yoke does not hit it.
Before upgrade:
IMG_1251_1_1.JPG
After upgrade:
170.panel.garmin.2.JPG
Posted: Thu Nov 22, 2007 5:54 am
by GAHorn
That
IS an upgrade! Now you don't descend when sitting on the ground!

Posted: Thu Nov 22, 2007 1:46 pm
by Kyle
Funny you should mention that - mine reads about the same, hey it's tired after 55 years of service
Posted: Thu Nov 22, 2007 4:04 pm
by hilltop170
George-
Who said I was sitting on the ground? The upper picture was obviously taken during one of my world famous dead stick air show routines right after the stall in a low level, vertical, hammerhead stall to tail slide maneuver. Not many folks do those in a 170 but I find them very relaxing. It does increase the workload a little to take pictures during the maneuver though.
The second picture was taken in the hangar.
Posted: Sat Nov 24, 2007 1:08 am
by GAHorn
hilltop170 wrote:George-
Who said I was sitting on the ground? The upper picture was obviously taken during one of my world famous dead stick air show routines right after the stall in a low level, vertical, hammerhead stall to tail slide maneuver. Not many folks do those in a 170 but I find them very relaxing. It does increase the workload a little to take pictures during the maneuver though.
The second picture was taken in the hangar.
Oh, NOW I SEE! That explains why the gyro compass and the mag compass are almost 180 degrees apart.... The gyro must have TUMBLED!
(I really recommend you keep your feet on the rudders and apply even pressure on both when you do the hammerhead/tail-slides. Otherwise it really beats the rudder badly, and can disconnect the rudder return-springs.
Posted: Sun Nov 25, 2007 1:33 pm
by Kyle
Doug, Richard,
My thanks to you both for the feedback and pictures. As it turns out I had copied the picture of Richards panel a while back from a previous post as it had peeked my interest (and envy). I have been tracking down some leads on 8-hole panels and I believe I will be able to borrow one to use as a pattern.
As it turns out I have a bit of additional equipment to locate as well, not just the NAV head. My KX125 is self-contained and I don’t have either an ILS antenna or a marker beacon receiver. I have to explore what the equipment interfaces are for this stuff and whether or not my KX125 will drive an ILS receiver. I’ll look on the Internet and see if I can download a manual (should have done that when I first got the plane). Although I would love to have an HSI in the panel, the budget won’t permit it. I have used the NARCO 122 and it was a great instrument. Apparently they are back in production and now will accept GPS input so in the future if I put a GPS in the plane that requires a NAV head, I would already have it installed. Not sure if that is what I will end up with, but your right Doug, it’s a nice piece of equipment.
Richard, my turn and bank indicator is currently an electric instrument and if I read another post correctly (if not someone please re-direct how I’m understanding that requirement), I may need to change that to a vacuum unit. Is yours in the lower hole short enough to clear the standard T bar, or do you use a Y type yoke? Great job on the circuit breakers under the panel. Even though it’s working currently, my wiring in the same area needs upgrading and that looks like the way to go – both for safety and it really neatens up the panel. OK – I have to ask, what is that little blue item right above the stall warning indicator?
As with anything else in aviation, everything is a balance. My annual date is 01 JAN 08 and you budget accordingly so my panel project will go one piece at a time until I have all the components. With any luck, I can gather what I need by next winter, so when I take the plane off line for the 09 annual, I can do the sub-panel and any other installs at that time. Someday I will put up a post listing all that was done in my last annual – but that’s another story… Thanks again for the input
Regards,
Kyle T.
Posted: Sun Nov 25, 2007 5:48 pm
by cessna170bdriver
Kyle,
If you have vacuum-driven attitude and heading indicators, it is a good idea to leave the turn coordinator as electric. That way if you have a vacuum system failure for any reason (not likely in a venturi-equipped 170), you still have an aid to staying right-side-up.
Richard,
Was it very cold the day you did your deadstick tailslide, or was the oil temp gauge inop? Also, good job of recovering in 350 feet...
Miles